When talking to people, especially in the sex-positive community, is about one's preferences. One person is a bottom, another is a top, and some are 'switch' (meaning both). Another preference is, of course, sexual orientation - straight, gay, bi etc. Occasionally I ran across a person who refuses to use labels on principle. "Labels are bad" is the typical reason for this…but is that true?
Many people believe labels are a bad thing, and many professionals, such as psychologists, subscribe to that view as well…but are they right? I for one, totally disagree. Labels have been historically associated with a lot of bad stuff, but that doesn't make them bad. Labels are a tool, just like knives. In the right hands, any of these things can be an important tool, and in the wrong hand, a dangerous weapon. Same goes for labels. A label by itself does no harm…but if someone uses a label to exclude someone (for example, barring people from using a bathroom because they don't exactly conform to the label of "male" or "Female"), then this is bad behavior. The problem there isn't with the label itself, but with the person or organization that is applying the labels and creating unreasonable rules.
Another way labels can be a problem is when they are applied to people incorrectly or inappropriately. This could be a result of misunderstanding the person a label is applied to, or a misunderstanding the label itself. It can also happen when the person or group applying the labels is doing a bad job due to being lazy, ignorant, and many other reasons. A classic example of this are bisexuals, which is a group of individuals in the LGBTQ community who have suffered from misunderstanding and mislabeling for years. Even within the LGBTQ community, bisexuals are sometimes misunderstood or discriminated against for various reasons. However, even what that happens, the fault is still with those who misunderstand and discriminate, rather than the label itself
When not being misused, labels are actually quite useful, because they save a lot of time and effort in communications. One classic example is "Pansexual" (like me), which defines a person who is capable of being attracted not only to both Females and Males, but also to many other people on the LGBTQ spectrum that are outside these two groups. Using that label to refer to a person is much more efficient and clear than trying to explain it to someone else using words.
The main challenge with labels is that there are so many of them, and some are difficult to clearly understand or differentiate. For example, many people don't understand the difference between Queer and Gay. A lot has been written about that difference, so I won't go into it here, but learning the vocabulary of the sex-positive community can be extremely useful to anyone venturing in that realm. You might not want to carry some of these to the outside-world, as the public may misunderstand and judge you incorrectly (for example, many people think that people who practice Polyamory are all promiscuous, which is incorrect, of course), but using them with our people is quite fantastic and fun!

Monday, December 23, 2019
Wednesday, December 4, 2019
Building a St. Andrew's Cross BDSM Rack
Nothing is more iconic as a heavy and dark St. Andrew’s
cross, and no BDSM dungeon should be without one. However, those things are expensive,
often selling for upwards of $1000. The good news is they are fairly simple to
build, and I have recently built one for my club. Here’s how you can build one
too.


The main design concepts behind my Cross:
1.
Flat design
2.
Folding leg for easy
storage
3.
Side-mounted cuff eyelets
4.
Thin, removable
back-cushion
There is no one-way to design a cross, and mine is slightly
different than others I’ve seen. I don’t claim to be an expert on these, so
please don’t assume any of the notions or ideas I have below are set-in-stone. My
cross has a lot of moving/folding parts, which make it easy to stow or
transport, but also make it less robust and stable than fixed-part ones.
Materials
You would need:
- 4 wood beams, 6x2x8 (6 inches wide, 2 inches thick, 8 feet long). I used “Prime Fir” from Home depot, which are about $4 each.
- Wood bars, 2x2 (you’d need about 5 feet total)
- 4 heavy hinges. I got mine for 50 cents each at Habitat for Humanity. If they didn’t come with screws, you’d need to get more of those listed at #5 below.
- 4 12” connecting plates, $4 each
- 30 heavy duty 1 ¼” #14 screws, about 20 cents each
- 8 heavy duty 3” #14 screws, about 50 cents each
- 4-8 heavy duty eyelets, screw-in types, about 90 cents each
- 1 or more lock-latch
- 1 securing pin (to secure the legs together when latched)
- Some kind of stain/lacquer/sealant/paint. I recommend polyeurethane.
- Sanding paper, block or sander tool
- Wood board, ½ to 1” thick, about 1’x2’ (for back-pad)
- Foam and upholstery-vinyl for the back-pad
- Staple gun and staples
- Electric drill
- Drill Set
- Screwdriver
- Measuring tape and/or large ruler
- Saw (ideally circular, or similar electric saw)
- Paint Brush
You could also benefit from having
a second power tool (screwdriver, drill or impact driver) so you can drill and screw
in all the screws quickly without having to swap-out the drill bit multiple
times.
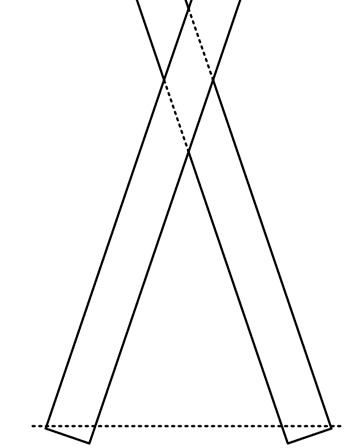
Design
This is the design I used. Note that the back leg connects
at about 60% of the height. You could attach it a bit higher, but I recommend
not going lower, as it could reduce stability. You could use a heavier wood,
like Cedar, Oak or Pine. I’ve attached two latches to the base board, so the
back leg can be connected at two angles. The back-pad is almost universal to
all crosses, but it can force the bottom to arch their back, which can be
unhealthy, so I made it easily-removable. The front has a standing board, which
is not mandatory, but increases stability, particularly if the person tied to
it thrashes a lot. Ultimately, no cross is heavy enough to hold-down an
average-weight American, so having that board is a good idea.
 Workflow/process

- Lay down the beams on top of each other, at the angle you desire.
- Use a pencil to mark the cut line of the bottom beam
- Cut the lower beam with your saw
- Carefully align the beam pieces and drill holes for the screws. I often just put the screws into wood directly without pre-drilling, but since we are using very thick screws here, and natural wood, it’s important, so as to avoid the wood splitting.
- Using the connecting plates and heavy screws, connect the two pieces of the beam you cut to the other beam, forming the cross. When doing so, use two plates on the top, and then flip over the cross and connect the other two plates. Also, make sure they don’t 100% overlap, so that the screws don’t accidentally “meet” inside the wood.

- Using a ruler, or another beam, mark out the bottom and top of the beams for cutting. When doing so, I advise measuring the length too, so as to avoid accidentally cutting the cross askew.
<<<See pictures of all the pieces and angles below>>>
- Attach the heavy hinges to the bottom and top bars, so that the back and bottom legs can fold inward. There are multiple ways to put the hinges, so it’s your decision. One consideration is for one of them to be set such so that the bottom leg folder “behind” the back leg. This makes it a little nicer when stored/stowed/carried.
- Measure out and cut the 3rd 2x6x9 beam to form the back and bottom legs. My back leg was 46 inches, and bottom board 20 inches long. You might need different sizes if your cross is higher or lower than mine. Also, my design tilts to about 15 degrees, but you might prefer it to tilt further (requiring longer bottom-board)
- Attach the legs to the hinges
- Attach the latches to the beams. I used the top-flap on the back-leg, and the eyelets on the bottom-leg. I placed one at the end of the leg, and a 2nd one in the middle, so as to allow two locking positions. If you like, you can attach more. A variation of this design is to cut channels into the bottom leg, into-which the back leg will go. However, I think my design is better, as a lock can be connected to the latch, securing the cross.
- Cut two pieces of the 2x2 bar, about 5-6” each. Place them on the side of the crossing and connect them to it with screws.
- Cut the front base board, and attach it to the front-leg with hinges. Make sure you do this when the cross is standing, so that the distance between beams is right, letting the board stay flat. If you make this connection earlier, you might end up with the board being off the ground, and that won’t work, as the hinges won’t sustain an adult’s weight.
- Take your back-pad wood and attach it to the bar pieces with 4 screws. Once you’ve upholstered it, you would be able to remove the screws attaching the bars to the cross, thus removing the pad, if needed.
- Cover the pad with foam, and upholster it using the staple-gun.
- Drill holes for the eyelets. Most crosses have the eyelets in the front, but I put mine on the sides. That way, a person is less likely to hit them when leaning against the cross. You can put as few as 4 eyelets (2 for the ankles, 2 for the wrists), but I put in a double set of wrist eyelets, so shorter people can still be cuffed to it with a sensible amount of comfort.
- Sand the complete cross, and paint it in any way or style you like. I recommend the high-gloss, thick poly resin, as it will protect the wood from sweat and other bodily fluids, and be easy to wipe-down. For some reason, almost all crosses are painted mahogany or similar dark tint, so I made mine that way too, but there’s no practical reason for that. Make yours RAINBOW colors!!!
- Once the paint has dried, make sure you carefully go over it and sand-down any rough spots or splinters. Even if you’ve sanded pre-paint, the paint itself often forms rough spots, so that’s important. This both avoids hurting the participants, and removes places that can collect bacteria.
- If the cross is designated to be used in a public place, like a club or rental property, I would advise testing it with friends or partners first, to make sure there aren’t any weak spots (for example, some lower-quality boards might release splinters, or even crack). You don’t want that happening to a customer or guest!


Subscribe to:
Comments (Atom)